

HTML Source EditorWord Wrap
By Fran Casselman
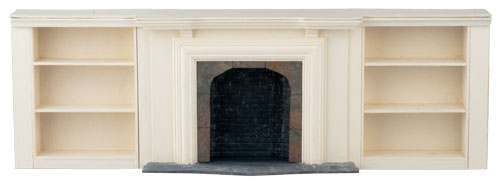
The fireplace/bookcase unit shown uses two modified #6942 Pediment-Top Bookcase Kits
Materials & Tools:
#6942 Pediment-Top Bookcase Kits
#2403 Jamestown Fireplace
#17512 3/8" width Strip wood
#17513 1/2" width Strip wood
#778 1/2"-Scale Rough Brick Sheet
#7069 Small Crown Moulding
gray-black acrylic paint
clear satin varnish
Cut back and side pieces of bookcase kits to height of fireplace. Assemble bookcases according to kit instructions, using the larger spacing template for the two lower shelves. Install the toe-kick panel at the front edge, not recessed. Tip: Save leftover bookcase pieces for other future projects.
Glue spacer pieces of strip wood to sides of bookcases, flush with front and back; 3/8" width strip wood near the fireplace and 1/2" width strip wood at the outside. Add end panels if needed for your installation.
From the back of the miniature fireplace, trim away the side mantel overhang to allow the modified miniature bookcase to fit directly against the fireplace. Do not cut away the front of the mantel; allow it to extend over the spacer piece.
Finish fireplace hearth and firebox as desired. I used a scrap piece of 1/2"-Scale Rough Brick Sheet for the firebox, dry-brushed with gray-black acrylic paint over white primer for an uneven look. (The firebox is open at the top back, so it is easy to insert an interior piece.) The “slate” surrounding the firebox opening is a small laminate countertop sample, cut to fit and scored to look like tiles. (Install after finishing.)
Sand as needed and paint the components as desired. Also paint a short length of small crown moulding to trim the top of the bookcases.
When all the paint is dry, glue the three components together, making sure they are flush at the back and bottom.
After the glue has dried, add the trim molding to the top of the bookcases, cutting the miniature fireplace end to fit against the mantle edge. (If needed for your installation, miter the open end and continue the molding around the corner.)
To create an even top surface, put the assembled unit upside down on a piece of poster board or smooth-surface mat board. Trace the outline of the top and cut out. Paint all sides, including edges, and let dry well. Glue the top to the unit, clamping and/or weighting as needed.
Sand as needed, touch up paint as needed, and apply one or two coats of clear satin varnish to entire unit.