


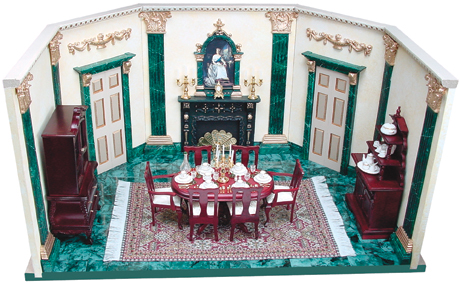
To create this display the #9998 Grand Room Box kit was used. This room box kit, with angled sides, was designed by the late Gail Vaughn to afford the same presentation style as the Thorne Rooms.

So, how do you paint the marble effect on wood and miniatures? On wood, begin by applying at least two thick coats of an oil-based primer like Kilz®. Heap it on--the unevenness of the base texture will prepare the surface for the mottled appearance of marble. Sand lightly to remove wood burrs. Note: On cast resin, you don't need to prime at all.
Select three shades of craft paints with which to work. For the main walls, I used "Buttercrunch" by FolkArt® as my base color and overlaid it with FolkArt's "Linen" and "Country Tan" from Apple Barrel Colors by Plaid®. For the green marble, I used a base of FolkArt's "Hunter Green" overlaid with FolkArt's "Green Forest" and "Green Mist" by Americana®.
I worked on the walls before assembling them. I laid them out flat and applied two coats of "Buttercrunch" with a foam brush until they were uniformly golden.
To create the dappled effect, I squeezed out puddles of "Linen" and "Country Tan" onto a piece of wax paper. Using a damp sea sponge, I dipped into one color and then tapped the sponge on a paper towel until I got a mottled pattern instead of globs of paint. Then, I dabbled the paint across the walls in "drifts." Decide which way your layers are drifting and hold to that general direction. Without waiting for the first color to dry, dip the sponge into the second color and repeat the process. Where the second color overlaps the first, new shades of color are created. Alternating between the two colors, I continued to cover the walls until I had built in irregular bands of lighter and darker shades.
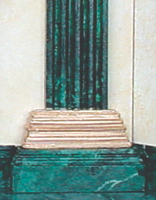
For the green marble, I applied a base coat of "Hunter Green" with a coarse bristled brush. Don't even try to apply the paint evenly--use sloppy, overlapping dabs so that the white primer shows through in some places, and other places get two applications of color. Stay aware of the direction of your "drifts" as you create lighter and darker areas. Since I followed a right-handed pattern on the walls, I reversed direction for the columns and base mouldings. After letting the base color dry, I applied the secondary colors of "Green Forest" and "Green Mist" using the same sea sponge technique I used on the walls.
In faux finishing, a marble-effect just doesn't look complete without veins. But, I decided against veining the walls because I didn't want them to detract from the ornamental properties in the room. On the green "marble" elements, I couldn't resist.
There are two ways to create veins: The most common for miniatures is to use a fine-pointed sable brush that has seen better days and cut the bristles until only a few hairs remain. Dip them into the paint and then--with a shaky hand--draw the line of your vein. I emphasize shaky because you don't want the line to be too smoothly defined. Before the paint dries, gently brush it with a dry fan-tailed brush to blur the line so that it seems to come out of the background instead of standing on top of it. This is the only technique to apply veins that are a darker color than your background. In general, the veins in marble follow the direction of the drifts but can fork off against the flow. Use restraint in placing your veins, adding only one every three or four inches. But, if your veins are lighter, as they are in this project, you can create them by scratching through the layers of paint down to the primer with the tip of a craft knife. The "shakiness: of the vein is created by scraping the line in short sections.
Finally, to seal your work and even-out the texture of the surface, apply a coat of varnish or polyurethane. Use a matte or gloss finish depending on how polished you want your marble to be. I used FolkArt's Artist Varnish Matte, which is water-soluble, and added a drop of "Green Forest" to slightly tint it. This softened the stark whiteness of my veins and blended them into their backgrounds.
-Sally Cook-Thomas
The Thorne Miniature Rooms were created under the direction of Narcissa Thorne during the 1920s and 30s. She spent her time, and considerable fortune, overseeing the replication of period-style rooms in 1" scale in order to preserve a history of interior design. Most of these rooms are currently on display at the Art Institute of Chicago and attract thousands of visitors every year.